Import Athletes from an Athletic.net Meet
THIS_HELP_ARTICLE_URL: https://raceapp.nethelp/import-athletic-net-meet-entries
If you’re hosting a meet and the entries already live on Athletic.net, you don’t have to retype the rosters or massage the data. Download the meet’s entry file once and upload it to RaceApp as-is. RaceApp recognizes the Athletic.net format automatically and pulls in every athlete.
This is one of two ways to import from Athletic.net:
- Direct roster import — pulls your own team’s roster from your Athletic.net team page. Paste the team URL on your Athletes page and hit Import. See Adding Athletes.
- Meet file import (this guide) — pulls every team’s athletes for a meet you’re hosting, from the meet’s entry file.
Step 1 — Download the entries from Athletic.net
- Open your meet on Athletic.net and go to Participants → Downloads.
- Under the Age, Grade, Level dropdown, pick what belongs in the level column:
- USATF for an all-comers / age-group meet (8U, 9-10, 11-12, and so on).
- Grade for a school meet (grades 1–12).
- Athletic.net also has an Age option — skip it. An age isn’t a grade, and RaceApp won’t guess a division from it. Use USATF or Grade so athletes come in with a usable level.
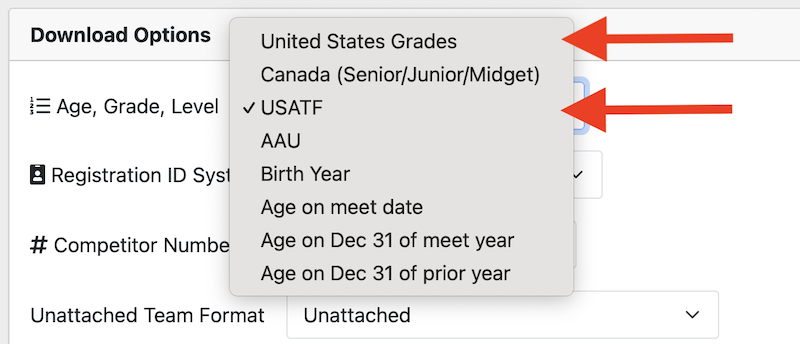
- If you’re running bib numbers, turn on a Competitor Number System first. Those numbers ride along in the file (see the note below).
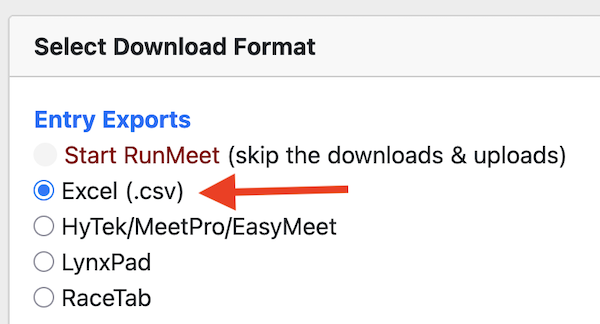
- Under Entry Exports, choose Excel (.csv).
- Click Download File and pick All Teams so you get every athlete in the meet, not just yours.
You’ll end up with a file named something like MeetEntries.csv.
Step 2 — Upload it to RaceApp
- In RaceApp, go to the guest-athlete import page for your meet. That’s the right home for a meet entry file — every athlete comes in under their own team name, including yours. (Just want your own team’s roster? Use the direct roster import instead — it’s simpler. And don’t upload an All-Teams meet file at Roster → Import — everyone in it would join your roster.)
- Upload the
MeetEntries.csvfile exactly as it downloaded. Don’t reformat it or delete columns. - That’s it. RaceApp detects the Athletic.net layout on its own and switches to the right importer — you don’t pick anything.
What gets imported
- Every unique athlete, once. Athletic.net lists a runner in every event they entered, so a sprinter in four events shows up on four rows. RaceApp collapses those into one athlete.
- Relay entries are skipped. Relays aren’t individual athletes, so they don’t get imported. The summary tells you how many were skipped.
- Team name comes straight from the file, so guest athletes land under the right visiting team.
- Level comes from the Division column when RaceApp recognizes it (Varsity, Frosh/Soph, the USATF age groups, and common spellings like “8 & Under” or “Open”). If the Division is blank, RaceApp falls back to a plain grade (1–12).
If RaceApp sees a division it doesn’t recognize, it still imports the athlete — with the level set to N/A — and lists the unrecognized division in the summary so you can fix those few by hand.
Step 3 — Assign and print bibs
Importing brings the athletes in. To hand out numbers, head to the Assign Bibs page, assign numbers (auto-assign is one click), and print your bib sheets. Do this after the import so everyone’s in the list.
Good to know
- This is a new feature. If something in your file doesn’t come through the way you expect, send it to [email protected] and we’ll take a look.
- Competitor Numbers: the file carries each athlete’s competitor number, but RaceApp doesn’t turn those into bibs yet — assign bibs on the Assign Bibs page. Carrying the Athletic.net numbers straight through is on the list.
- USATF divisions: the age-group spellings RaceApp maps are best-effort. We’ve verified the school format (Varsity / Frosh/Soph) against a real download but not yet a USATF one, so if an age-group division comes in as
N/A, that’s why — tell us the exact spelling and we’ll add it.