Cross country is the easier sport to time. Since every course is different, FAT timing is less of a concern, but having a system in place like RaceApp still significantly improves the experience for everyone over hand timing.
So if you’re hosting a small to medium sized XC meet — a dual, a tri, a small invitational — chip timing is overkill. A pro timing company is overkill. Expensive hardware is overkill. What you actually need is an iPad, a stack of bib labels, and about twenty minutes of setup. Here’s how I do mine.
What you need
- An iPad or just your phone. Doesn’t need to be new — a 2017 iPad does the job. A phone works too. More on that below.
- A tripod. Any tripod with a phone or tablet adapter. ~$25 on Amazon if you don’t already have one.
- Printed bib labels. RaceApp generates these for you, one per athlete with a QR code.
- A RaceApp account. The free tier handles up to 75 athletes per meet if you want to try it first.
- Two helpers in the finish chute. No advanced training needed.
That’s the whole list. The point isn’t replacing a chip system — XC doesn’t need that kind of precision. The point is replacing the post-race scramble of clipboards, calculators, and someone retyping names into a spreadsheet at midnight.
Before the meet — takes about twenty minutes
Meet setup. Create your meet then add your races. For a typical small XC meet that’s Girls JV, Boys JV, Girls Varsity, Boys Varsity.
Import your roster. Athletic.net and MileSplit pull right in. Otherwise paste a CSV. Once athletes are in the system, you can assign bib numbers in bulk.
Print bib labels. RaceApp generates a sheet of labels — one per athlete with their name, bib number, and a QR code. Print on Avery 8160 sheets (two other label sizes work too, or switch to half-sheet pinned bibs if you want to use video or manual entry). Each athlete sticks one to their jersey, or safety-pins it through the backing. Full how-to for QR labels →
At the meet — the chute workflow
Same flow whether you have 30 runners or 100.
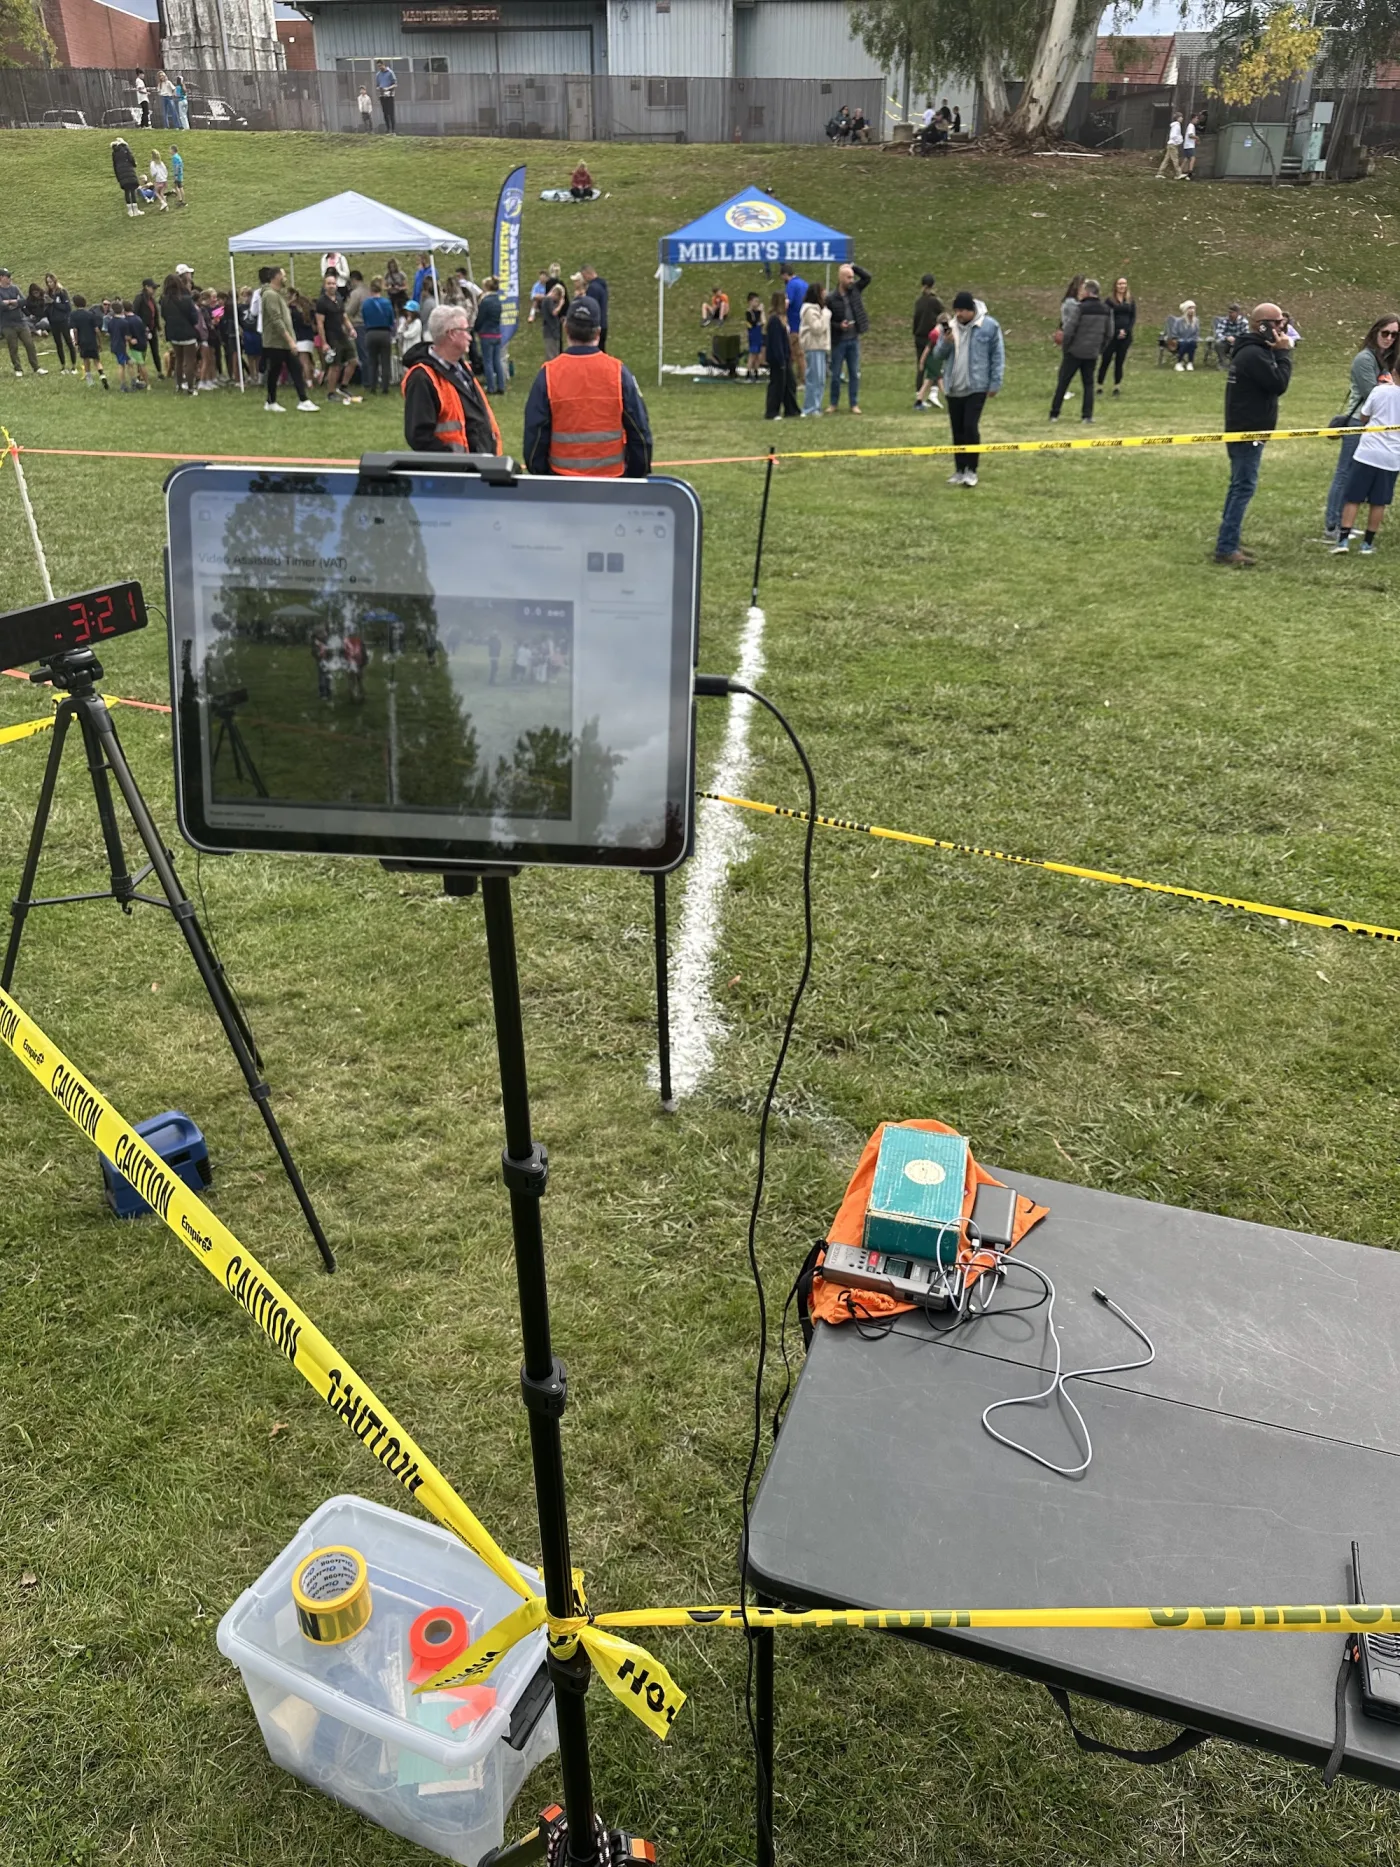
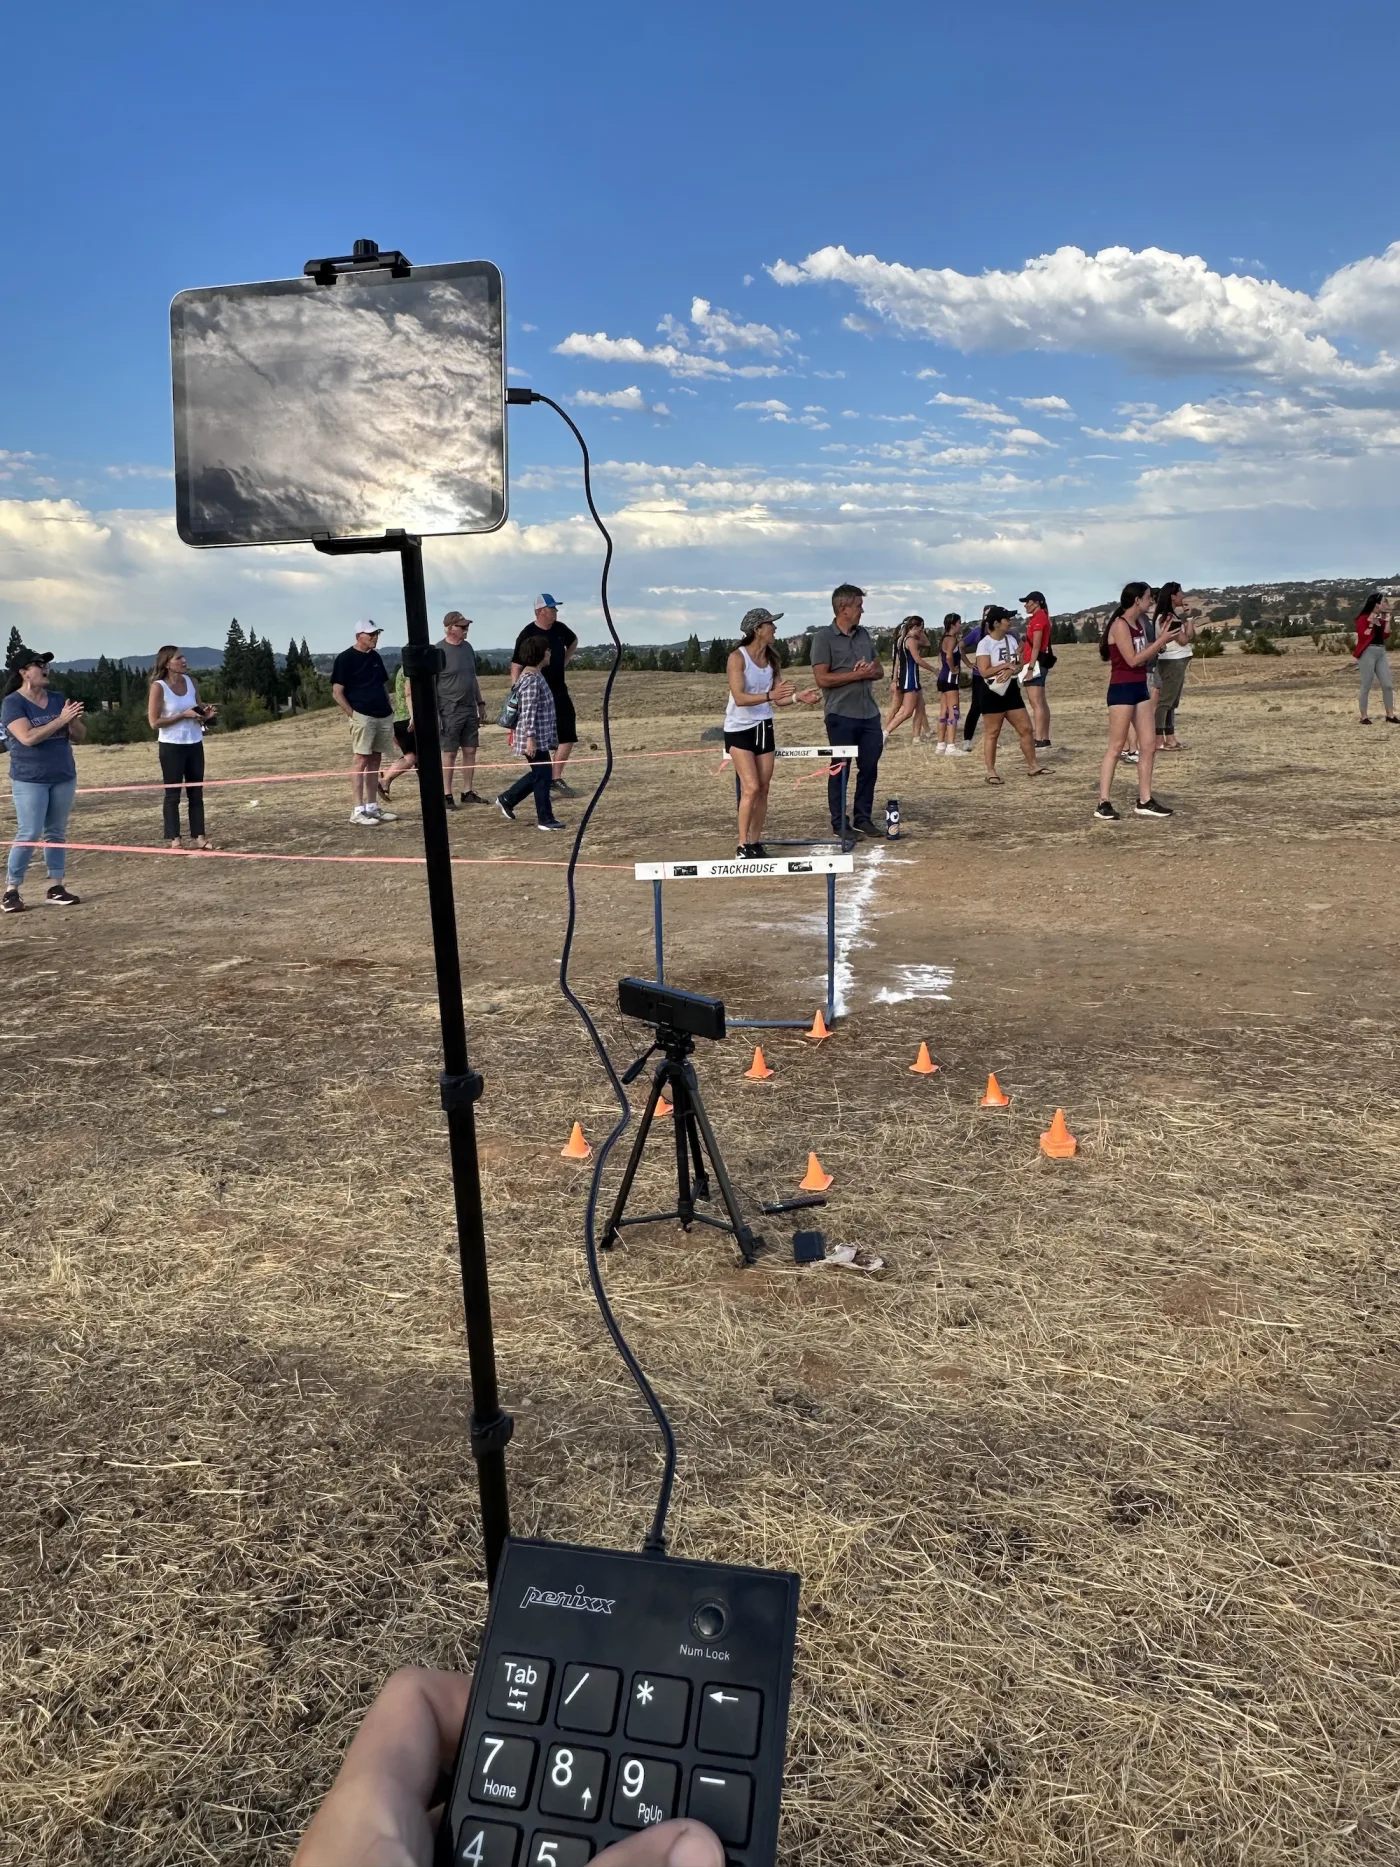
Set up the iPad at the finish. Tripod perpendicular to the finish line and about 10–15 feet back, iPad in landscape, framed on the chute. Open the Video Assisted Timer (VAT) page in Safari and point the camera at the finish. (Navigate to the current race -> “Timer” menu)
Start the race. From your phone at the starting line, tap Start in the RaceApp web app. The clock is running and the spectator page is live. – You can start from one device and resume on another if the start and finish lines are not close together. For example on your phone you can go to “Timer” -> “Hand Timer” to start the race, then back on your iPad at the finish line you can refresh the page and the timer will be running.
Mark each finisher as they cross. Tap the big Mark button when each runner’s torso crosses the line. The VAT page captures a stitched panorama image of every runner crossing — that image goes live on your meet’s public results page so spectators see the actual finish, not just the times.
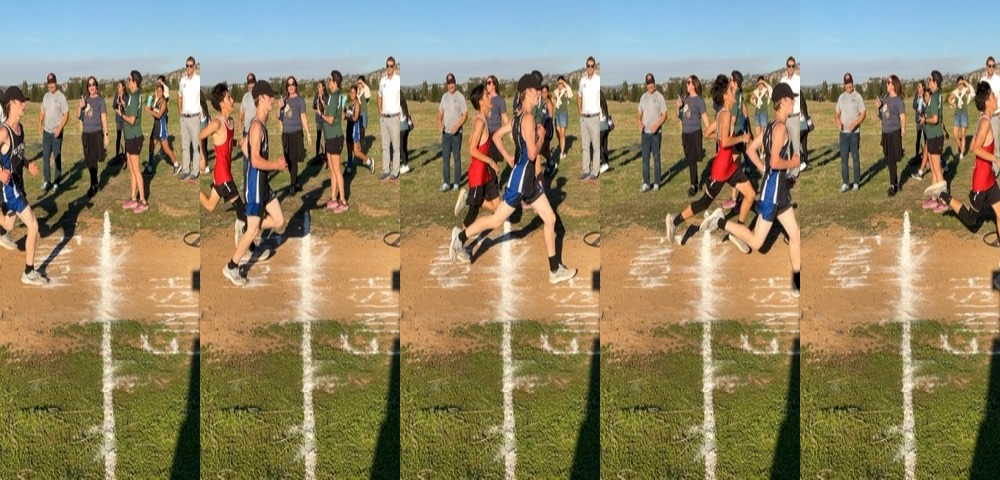 Example finish line panorama
One tip: plug a cheap USB number pad into the iPad — anything around $10 on Amazon. Tapping the screen works, but a physical button with tactile feedback is way more reliable when six runners pour through the chute back to back. You’re not second-guessing whether you hit it. Bluetooth or wired, both work.
While that’s happening, your chute volunteers do their job. As each runner exits the chute, they peel off the QR label and stick it in order on a clipboard or piece of cardboard. The order on the clipboard matches the order they finished. That’s the entire chute volunteer training: stick the labels on this board in the order runners come through.
If a label falls off or even if someone was not entered in advance, just have your volunteer write down the runner’s name in between the other labels. When scanning in results, just switch to manual typing mode for that entry then switch back to the QR scanner.
After the race — results in two minutes
RaceApp is then ready to pair up the two pieces - the captured times + the list of finishers.
If you used QR labels: open the bib scanner on your phone and scan the labels in order. Each scan ticks the next finisher in the list. A 60-kid race takes less than two minutes.
If you wrote down numbers: snap a photo of the handwritten sheet. RaceApp’s OCR reads the numbers and imports them. Ten seconds, and it’s surprisingly good — I’ve used it on sweaty, smudged sheets and it still works.
Results go live immediately. Times, places, team scores, the panorama photo of each finisher. Parents refresh the public results page on their phones and the kid’s time is right there.
Export to Athletic.net when you’re ready to post official results. One click will export the entire meet to the Athletic.net format.
No iPad? No problem.
Open the same VAT page on your phone, point it at the finish line, mark finishers. Bib collection works the same way. Shakier video, smaller screen — but the results are the same.
The VAT timer and the QR scanner both run right in the browser, so you’re not locked to Apple — any reasonably new phone or tablet works, Android included. Just test your device ahead of time so you’re not finding out at the start line.
For more on building up your setup level by level, see Back to Basics: Your RaceApp Setup at Every Level.
Always have a backup
Things happen. No matter the meet, you always need a backup plan. The simplest thing is to get another volunteer to pull up https://raceapp.net/timer on their phone and be another manual timer for you. It’s completely free and can easily share the results when you finish.
Pro tips: - Count the number of runners at the starting line (if possible) so you know when everyone is finished - Have your primary and backup timers call out the number of finishers periodically as the race goes on to ensure they have the same number. “I have 15” - “Check, I have 15”, and so on. - See our blog post on how to print out the times right at the meet with an inexpensive bluetooth label printer.
When to upgrade
This setup gets you through most small XC meets. Two situations where you’ll want more gear:
Bigger races (100+ runners): - Make sure your finish chute is extra long. - Have more helpers usher them through the chute and collect labels from any kids too spent to make it to the end of the chute.
Extra large races or a road race where a tight finish chute to collect labels is impractical — Use a staffed finish line with a laptop operator. The RaceApp FAT iOS app now lets you mark finishers live in a separate laptop browser while the iPad is still recording. No chute clipboard. No after-race scan.
Key aspects: - Switch to the iOS FAT App instead of the browser’s ‘VAT’ page. - Use bibs instead of labels so their bib numbers can be read on camera. - Use a second iPad or iPhone aimed back at the finish line to capture the bib numbers. - Set up a laptop on the same network as the two iPads/iPhones and load the primary iPad’s built-in management webpage. - Use the laptop to review the running video and mark each runner and type in their bib number.
More on that in a separate post →.
What you’re actually replacing
If you’ve ever hand-timed an XC meet, you know how it ends: a stack of paper, three timers comparing watches, someone arguing about who Place 23 was, then having to spend an hour or two typing into a spreadsheet after you get home.
This setup replaces all of that. The times come from the VAT camera. The order comes from the chute volunteers. The two get paired up in two minutes. Results are live before the next race comes in.
Cross country doesn’t need fractional-second precision. It needs a workflow that doesn’t fall apart at the chute. That’s the workflow, and it works for everything from a 30-kid dual to a 300-kid invitational.
| Try RaceApp free | See pricing | Read the basics |