Professional Fully Automatic Timing (FAT) systems can cost $5,000 to $15,000+. That’s out of reach for most school programs. But you don’t need expensive equipment to give your athletes accurate, reliable times.
Here’s the complete setup I use with RaceApp to run FAT timing at our meets - total cost under $300 (assuming you already have an iPad).
The Complete Kit
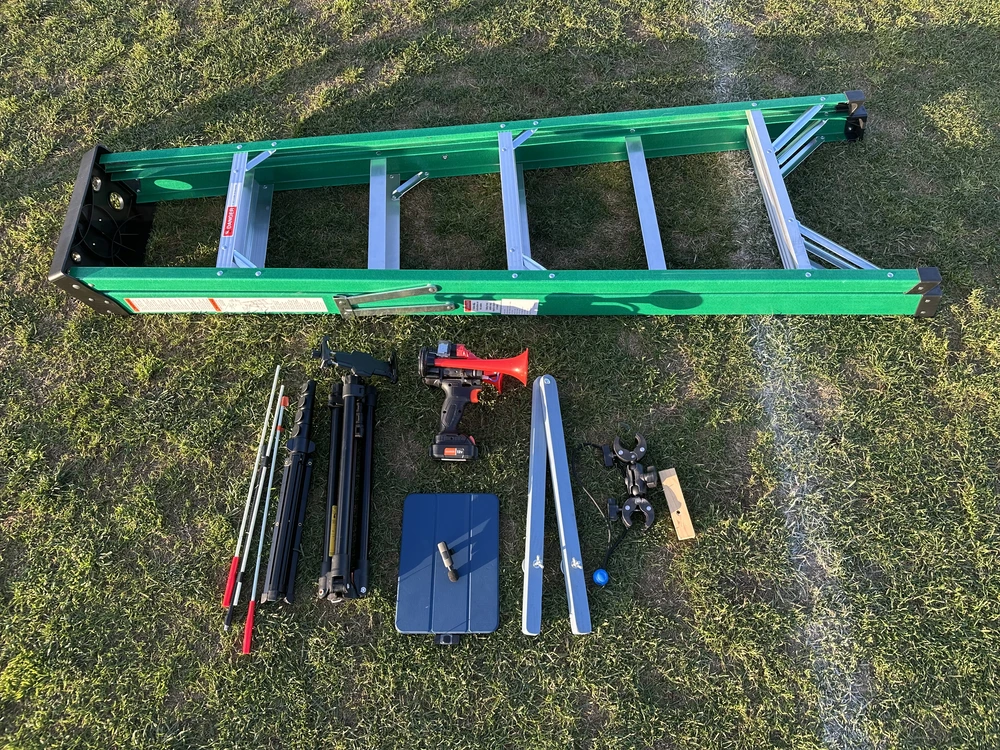
Here’s everything I bring to the finish line on race day:
| Item | Purpose | Approximate Cost |
|---|---|---|
| iPad (any model with slow motion camera) | Runs RaceApp FAT Timer | (you probably have one) |
| 6ft Ladder | Elevated camera platform | $89 |
| Tall Tripod with iPad Mount | Positions iPad to see all runners in a photo finish | $26 |
| Super Clamp + Ball Head | Attaches an umbrella to ladder | $15 |
| Second tripod + rods | Lifts starting microphone high in the air | $21+7 |
| Air Horn Starter | Starts races | $40 (see my other post) |
| Wood scraps + bungee ball | Stabilizes tripod to ladder | ~$5 |
| A few bolts, washers, wingnuts | Makes the “V” shape wood scraps easily removable | ~$5 |
| Walkie-talkies (optional) | Communicate with starter | $20/pair (see PA system post) |
Total: ~$200-300 (plus iPad)
Why the Ladder?

You need elevation to capture all 8 lanes clearly. A 6-foot fiberglass ladder gives you:
- Height: iPad sits about 7+ feet up, looking down at an angle
- Stability: Much sturdier than a tall tripod on grass
- Portability: Folds flat, easy to transport
- Versatility: Also useful for… laddering (the school probably already has one)
I position the ladder about 6-8 feet back from the finish line, on the infield.
The Mounting System
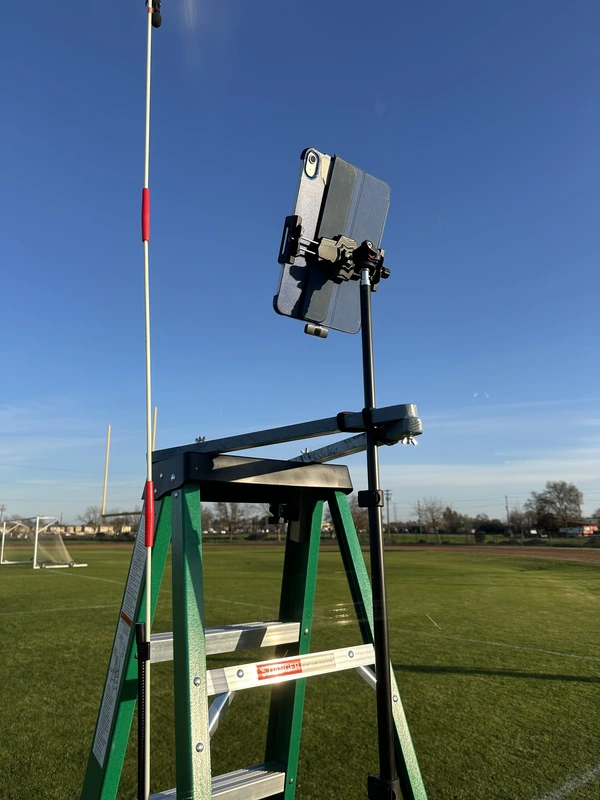
Here’s a DIY trick that makes a big difference: I bolted two small pieces of wood to the top of the ladder in a V-shape. The tripod arm sits in this V, and I use a bungee ball cord to strap it down tight. (note that the wood in this pic is painted gray and is at the top of the ladder)
This does two things: 1. Prevents tipping - even if someone bumps the ladder, the iPad isn’t going anywhere 2. Reduces vibration - the bungee absorbs small movements instead of transferring them to the camera
Total cost: a couple wood scraps and a $1 bungee, 3 carriage bolts, a few washers and wingnuts.
The iPad View
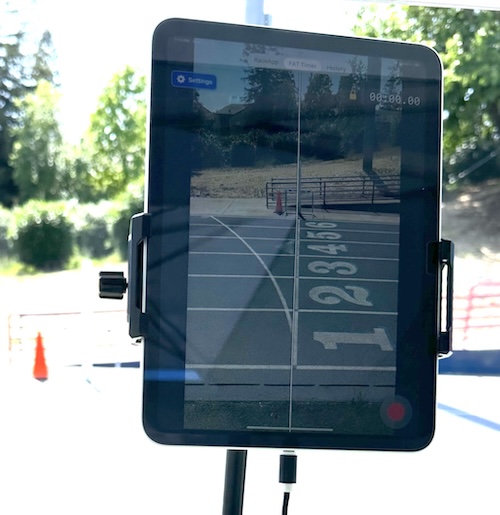
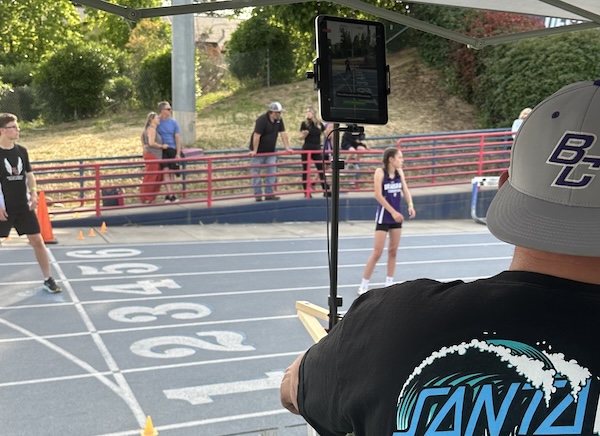
RaceApp’s FAT Timer shows: - Live camera feed with finish line overlay - Running timer (synced to the start signal) - Record button for capturing finishes - Quick access to review and mark times
The app records finish line video at up to 240fps. After each race, scrub through frame-by-frame and tap to mark each athlete’s finish. Then export times directly to your RaceApp.net meet with one tap - no manual re-entry. Times are accurate to 1/100th of a second.
Setup Checklist
Race day setup takes about 5 minutes once you’ve done it a few times:
- ☐ Position ladder 6-8 feet back, perpendicular to the finish line. Using the infield works best but on the outside of the track as well if that improves lighting.
- ☐ Seat tripod arm in the V-bracket on top of ladder
- ☐ Secure with bungee ball cord
- ☐ Mount iPad and adjust angle (looking down at finish line)
- ☐ Open RaceApp FAT Timer, verify camera alignment
- ☐ Set up the second tripod with extra tall rods and attach the microphone to the top. Your starter will carry this around and keep it near the gun.
- ☐ Test with a practice run!
Tips for Best Results
Lighting: - Position so the sun is behind or to the side of the camera - Avoid shooting directly into the sun if possible - Overcast days actually work great (no harsh shadows)
Stability: - The wooden V-bracket + bungee keeps the tripod locked in place - On windy days, have someone hold the ladder base or use sandbags on the feet
Camera settings: - RaceApp handles this automatically - tap the lock button on the main screen to turn off auto focus, then tap on a point on the screen somewhere around the middle of the track in the live view to have it lock focus on that point. You don’t want the auto-focus to suddenly try to refocus as someone in lane 1 runs by. - 240fps slow-mo gives you the most frames to work with - Make sure iPad is charged or bring a battery pack
What This Setup Won’t Do
Let’s be real about limitations:
- Not certified for championship meets - official FAT requires certified equipment
- Have Helpers - This isn’t a one-person operation. When I run a meet, I act as the roaming director and have these main helpers:
- iPad operator - Dedicated to running the FAT Timer. Starts recording before each race, marks finish times after.
- Starter - Carries the microphone stand to each starting position. The horn or pistol sound triggers the timer.
- Race recorder - Stands near the finish line and writes down bib numbers in the order athletes cross. Good handwriting matters!
- Race importer - Takes the paper from the recorder and snaps a photo with their phone. RaceApp’s AI reads the handwritten numbers and matches them to the finish times from the iPad. (See how it works)
Why this separation? The iPad captures precise times automatically, but it doesn’t know who’s who. The recorder identifies athletes by their bib numbers. The AI import bridges the two - no manual data entry needed.
- Weather dependent - heavy rain = pack it up
- Learning curve - first meet will be slower while you get the hang of it. Try the entire process during one of your normal team practices.
But for dual meets, invitationals, and practices? This setup gives you times that are way more accurate than handheld stopwatches, at a fraction of the cost of pro systems.
The Bottom Line
You don’t need a $10,000 timing system to give your athletes accurate times. With an iPad, a ladder, and about $200 in mounting gear, you can run FAT timing at your meets.
RaceApp makes the software side easy - the app handles video capture, frame-by-frame review, and syncing times back to your meet management.